Building Network tunnel in Rust
It all started from picking up wireguard white paper and trying to setup wireguard and see how it works.New words and concept here and there, then decided to build a simple network tunnel in rust just to understand some of the workflow of wireguard from user-space standpoint.
This article is a simple note on what i understood so far and its better illustrated in a way to grasp the whole gist.
Tun Interface
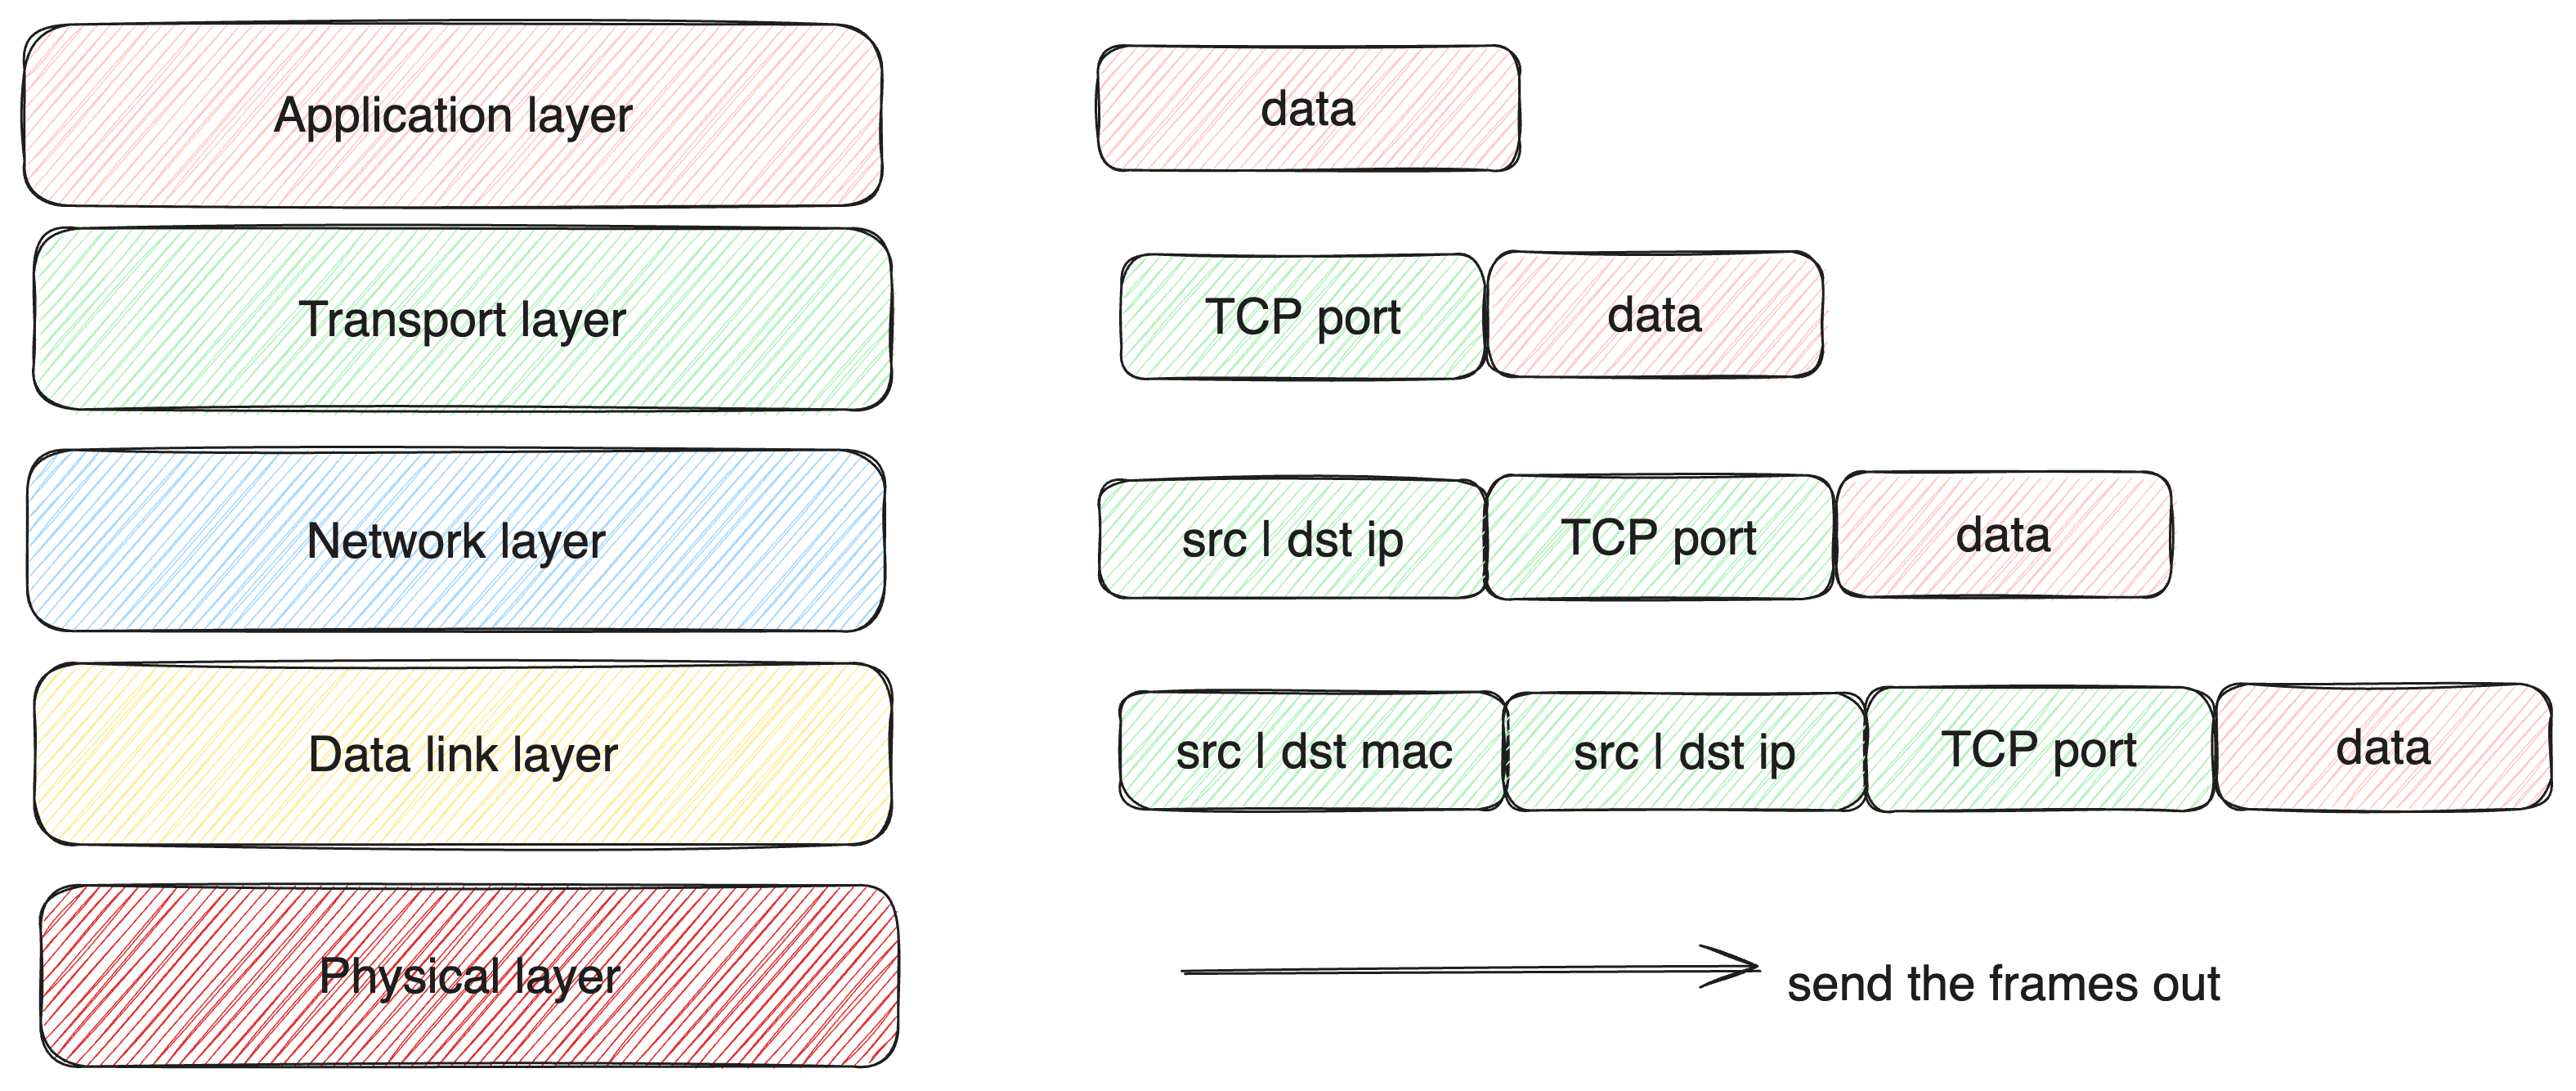
For simple illustration, i will start with using the OSI layer to show how the data flows
Each of our operating systems, do have a network device interface and virtual network interface, this can be viewed by either using ip command or ifconfig
$ ip addr

1: lo0: flags=8049<UP,LOOPBACK,RUNNING,MULTICAST> mtu 16384
	inet 127.0.0.1/8 lo0
	inet6 ::1/128
	inet6 fe80::1/64 scopeid 0x1


2: en0: flags=8863<UP,BROADCAST,SMART,RUNNING,SIMPLEX,MULTICAST> mtu 1500
	ether ad:f0:86:9c:5d:2f
	inet6 fe90::7ad:a8b:cc20:268a/64 secured scopeid 0xf
	inet 192.168.0.103/24 brd 192.168.0.255 en0
The above shows the loopback (lo) virtual nertwork interface used to manage localhost connection. Also we have en0 this a network device inteface used to manage ethernet connection, macOs represent them with en0 and on linux os they are represented as eth0.
The eth0 interface is assigned the ip address assign to us by the router using DHCP, and the mac address associated to this interface is the physical NIC address.
We also have a routing table
$ ip route

default via 192.168.0.1 dev en0
127.0.0.0/8 via 127.0.0.1 dev lo0
127.0.0.1/32 via 127.0.0.1 dev lo0
169.254.0.0/16 dev en0  scope link
This tells our device how to handle outgoing and incoming packet and what interface should be used to handle them. for example default via 192.168.0.1 dev en0; shows that any packet whose destination network isn’t specifically known should be sent to en0 and en0 is linked to my router at 192.168.0.1, hence packet reaching en0 will be sent to the router.
Packet leaving en0 or eth0 interface will concpetually look like the image below, if we are to communicate with twitter

Also you can conceptualize network interface as points where packets or frames are sent and can then be handled either by the kernel or user space.
Having that as our basics for network virtual and device interface; we are not limited to only those specific interfaces, we have the capacity to create ours, and that is where tunneling comes in.
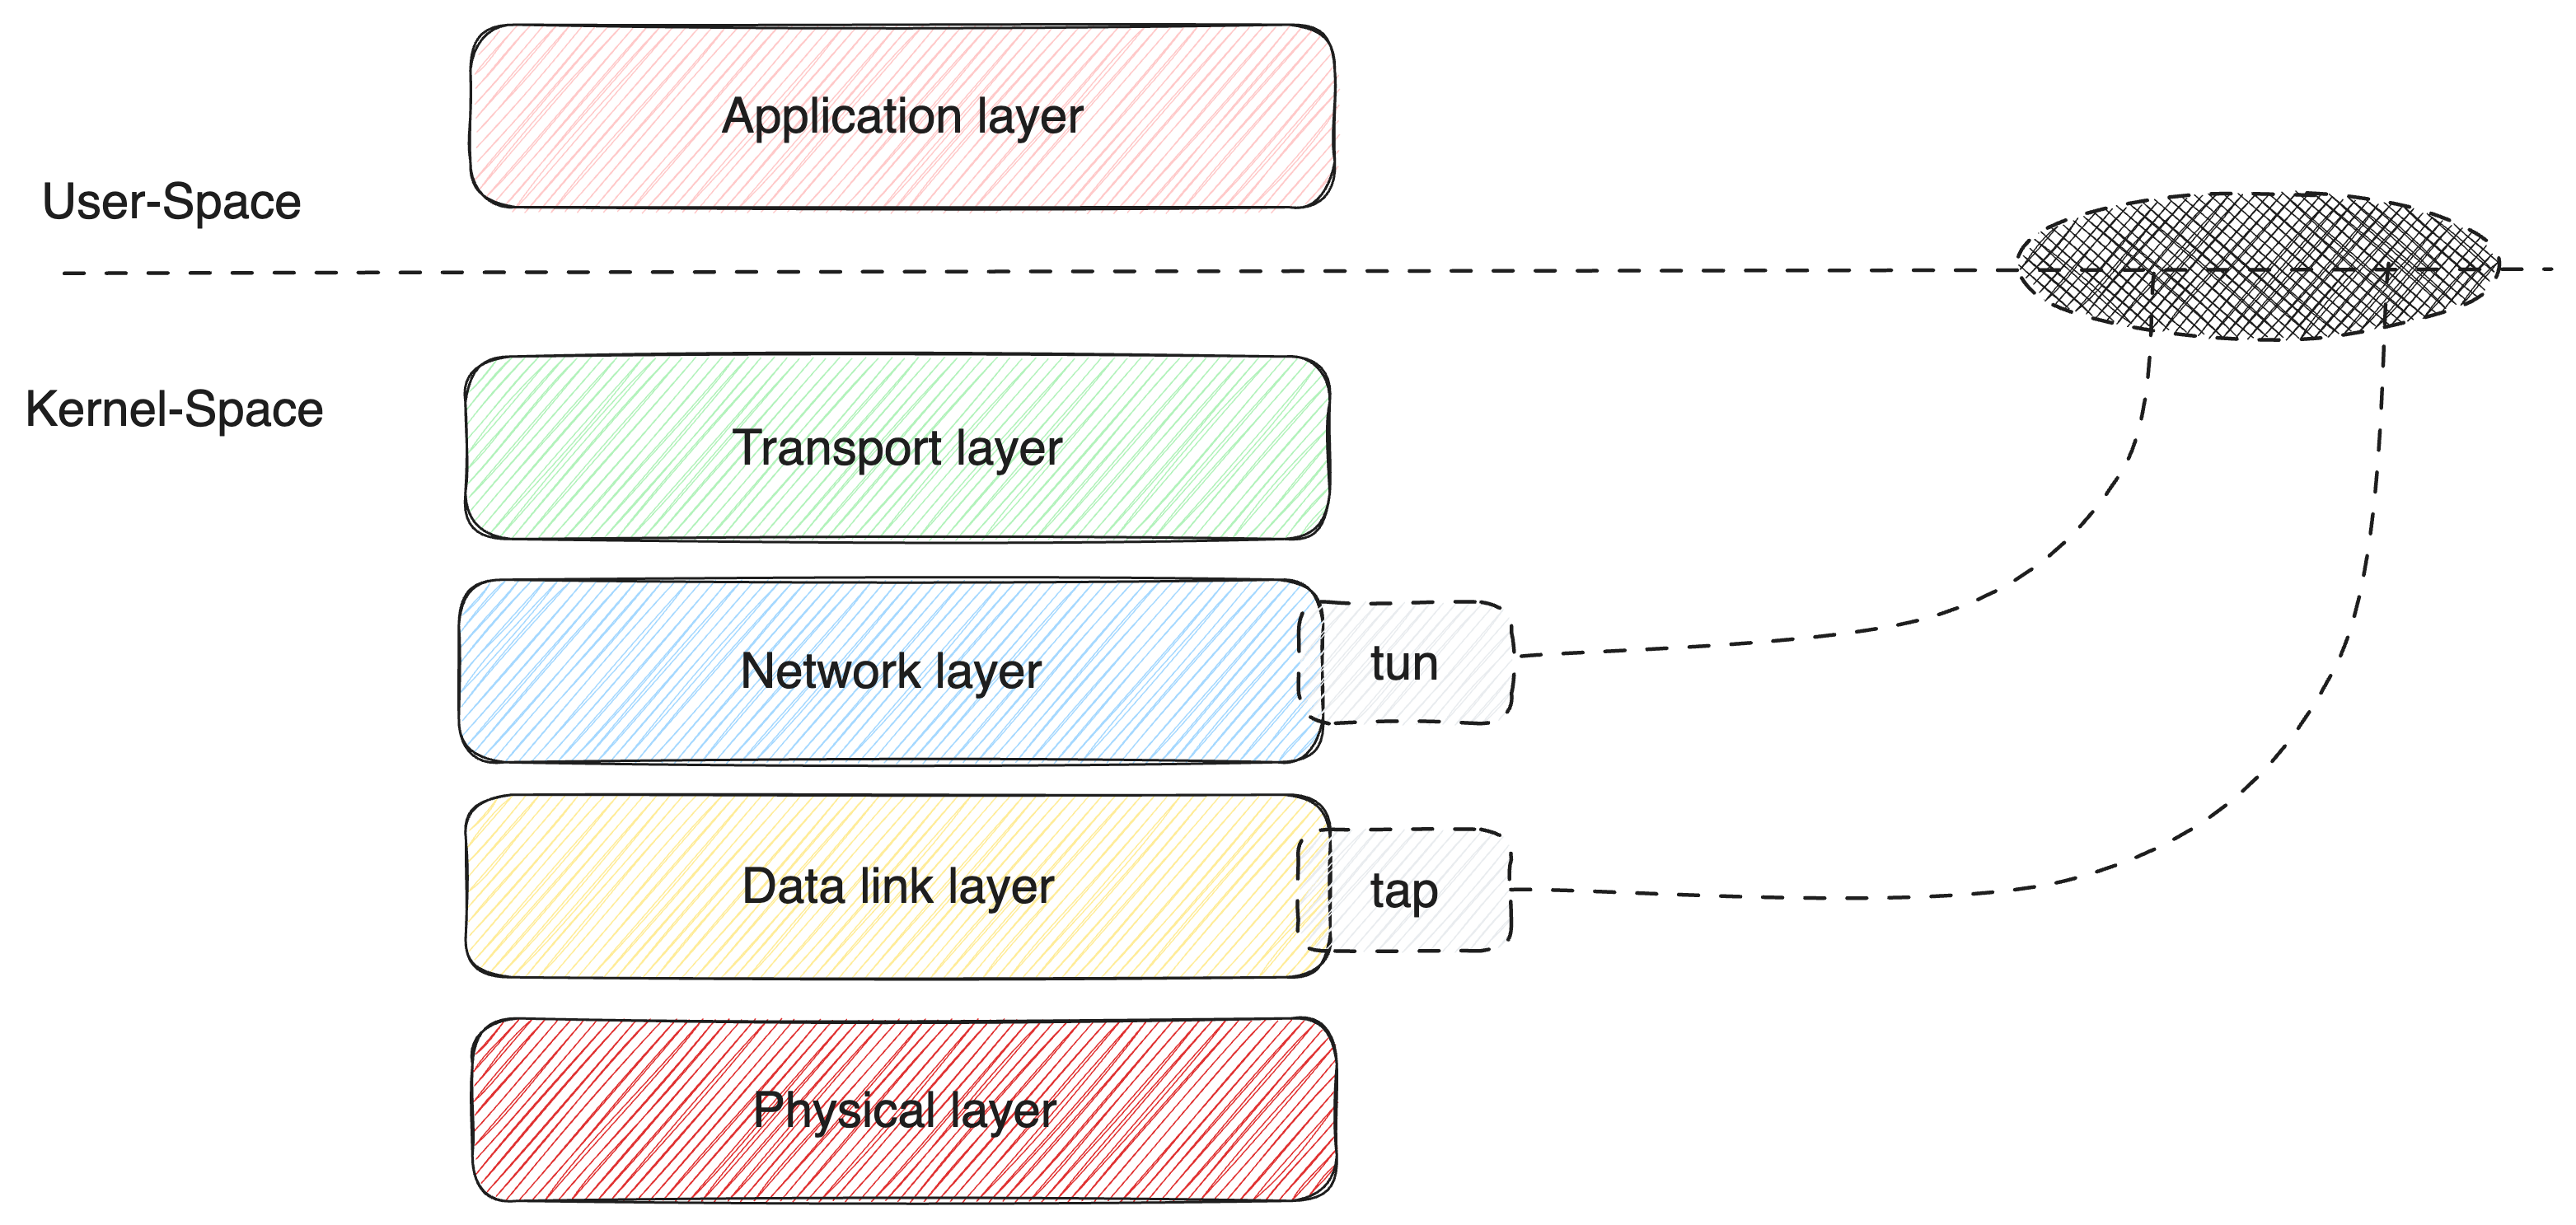
The image above demarcates the osi layer into user-pace and kernel-space, in simple terms it means space you, as a user have control over and the latter means space managed by the operating system internals.
Tun interface is attached to the Network layer and the Tap is connected to the Data link layer, this helps to capture packets and frames to which user space can have access to.
Focusing on tun interface let’s see how we can set that up:
# create a un interface
$ sudo ip tuntap add dev tun0 mode tun

# Assign an ip address
$ sudo ip addr add 10.0.0.1/24 dev tun0

# Bring the TUN device up
$ sudo ip link set dev tun0 up
Checking our list of interfaces to see if the tun interface is listed
$ ip addr

1: lo: <LOOPBACK,UP,LOWER_UP> mtu 65536 qdisc noqueue state UNKNOWN group default qlen 1000
    link/loopback 00:00:00:00:00:00 brd 00:00:00:00:00:00
    inet 127.0.0.1/8 scope host lo
       valid_lft forever preferred_lft forever

2: tun0: <NO-CARRIER,POINTOPOINT,MULTICAST,NOARP,UP> mtu 1500 qdisc pfifo_fast state DOWN group default qlen 500
    link/none
    inet 10.0.0.1/24 scope global tun0
       valid_lft forever preferred_lft forever

3: eth0@if5022: <BROADCAST,MULTICAST,UP,LOWER_UP> mtu 1500 qdisc noqueue state UP group default
    link/ether 02:42:ac:1a:00:03 brd ff:ff:ff:ff:ff:ff link-netnsid 0
    inet 172.26.0.3/16 brd 172.26.255.255 scope global eth0
       valid_lft forever preferred_lft forever
The tun device is added to the list of interfaces, but now it’s just there it is does nothing.
$ ip route show

default via 172.26.0.1 dev eth0
10.0.0.0/24 dev tun0 proto kernel scope link src 10.0.0.1 linkdown
The ip route for tun0 shows that every packet with ip 10.X will be directed to tun0. we can setup an ip route for external network
$ route add -host 93.184.215.14/32 gw 10.0.0.1 dev tun0

$ route
Kernel IP routing table
Destination     Gateway         Genmask         Flags Metric Ref    Use Iface
default         172.26.0.1      0.0.0.0         UG    0      0        0 eth0
10.0.0.0        0.0.0.0         255.255.255.0   U     0      0        0 tun0
93.184.215.14   10.0.0.1        255.255.255.255 UGH   0      0        0 tun0
Hence, any time the desitnation ip is 93.184.215.14 the tun0 interface will capture that to be used in the userspace.
Coming to the userspace, the tun interface is exposed as a file descriptor
let fd = match unsafe { open(b"/dev/net/tun\0".as_ptr() as *const _, O_RDWR) } {
            -1 => return Err(Error::Socket(io::Error::last_os_error())),
            fd => fd,
        };
the file name is /dev/net/tun, we read the file and then have a descriptor assigned to a variable fd. Well, the tun is not created yet, it need some ohter tools to make it possible to configure and spin up tun with our program and they are:
- File descriptor from
/dev/net /tun - Socket: this helps to target the kernel network stack
- ioctl : syscall to manipulate the underlying device parameters of special files
- ifreq: socket interface used to configure network device interface.
To create tun interface and then configure the tun device like we did using the ip command, we would first need to associate the fd descriptor created with the network interface, this to ensure that every network packet routed to the network interface will be directed to the file descriptor.
To enable that, we need to set the ifreq struct has shown below:
struct ifreq {
   char ifr_name[IFNAMSIZ]; /* Interface name */
   union {
       struct sockaddr ifr_addr;
       struct sockaddr ifr_dstaddr;
       struct sockaddr ifr_broadaddr;
       struct sockaddr ifr_netmask;
       struct sockaddr ifr_hwaddr;
       short           ifr_flags;
       int             ifr_ifindex;
       int             ifr_metric;
       int             ifr_mtu;
       struct ifmap    ifr_map;
       char            ifr_slave[IFNAMSIZ];
       char            ifr_newname[IFNAMSIZ];
       char           *ifr_data;
   };
};
For associating a file descriptor with the tun interface we only need to set the ifreq name
// create a memory space for type ifreq initalized with zero
let mut ifr: ifreq = unsafe { mem::zeroed() };


// set the name of the on the interface
unsafe {
    // copy the name from dev_name_bytes
    //into ifr.ifr_name without overlapping in memory
    ptr::copy_nonoverlapping(
        dev_name_bytes.as_ptr() as *mut i8,
        ifr.ifr_name.as_mut_ptr(),
        dev_name_bytes.len(),
    );
}

// set the flag to shouw the type of interface which is TUN
ifr.ifr_ifru.ifru_flags = IFF_TUN | IFF_NO_PI | IFF_MULTI_QUEUE;

if unsafe { ioctl(fd, TUNSETIFF as _, &ifr) } < 0 {
    return Err(Error::IOCtl(io::Error::last_os_error()));
}
Focusing on ifr.ifr_ifru.ifru_flags = IFF_TUN after we’ve set the name of the Ifreq we set the flag to be tun device. and then the sys call ioctl(fd, TUNSETIFF as _, &ifr); makes a syscall to associate the tun device with the tun interface ifr with name tun0.
The next thing will be to configure the ip address, the mtu, spin up tun interface like we did with the ip commands. To do this, there is a basic structure, we make a sys call targeting the tun interface in the netowrk stack using a UDP socket;
// set up the UDP socket
let socket_tun = match unsafe { socket(AF_INET, SOCK_DGRAM, 0) } {
            -1 => return Err(Error::Socket(io::Error::last_os_error())),
            fd => fd,
        };

// initialize ifreq struct
let mut ifr: ifreq = unsafe { mem::zeroed() };
unsafe {
    ptr::copy_nonoverlapping(
        self.name.as_bytes().as_ptr(), // name of the interface tun0
        ifr.ifr_name.as_mut_ptr() as *mut u8,
        self.name.len(),
    );

    // configure the ifru_flags to IFF_UP;
    ifr.ifr_ifru.ifru_flags |= (IFF_UP | IFF_RUNNING) as c_short;

    // syscall with instrcution code SIOCSIFFLAGS to configure
    // tun interface flag
    ioctl(self.socket_tun, SIOCSIFFLAGS, &ifr)
}
This basic structure is applicable to every other configuration. netdevice(7) contains all other instruction code to configure respective part of the tun interface.
Before we close this chapter of tun interface, what happens if the tun interface goes down, or somehow the interface was deleted, the whole program collapse abruptly, we might want to handle the canceling of the program gracefully. Studying wireguard-go i came in contact with two different approach.
- First approach: Remember we associated a file with the tun interface, what they did was try to write to this file and base on the response from this file you can know if its still up and down. this function was added to a goroutine so the system can always be aware anytime its down [*]
- Second Approach: They make use of NetLink this enable communication between the kernel and userspace, it still make use of socket but no ioctl for syscall. I read it is good for when the kernel is sending information to the userpace. Hence wireguard use this to recieve tun interface state from the kernel [*]
Tunneling (VPN like) structure

The image above shows the whole flow from pinging a domain like twitter to sending it over to our server and then to the internet.
 loop {
    let mut read_fds = FdSet::new();
    read_fds.insert(tun_fd);
    read_fds.insert(socket_fd);

    match select(None, &mut read_fds, None, None, None) {
        Ok(_) => {
            if read_fds.contains(tun_fd) {
                match tun.read(&mut buf) {
                    Ok(amount) => {
                        if amount > 0 {
                        //packet can be process or encrypeted here before
                        // sending it out to the server or client
                            socket.send_to(&buf[0..amount], peer_ip);
                        }
                    }
                    Err(e) => {
                        eprintln!("Error reading from TUN: {}", e);
                        break;
                    }
                }
            }

            if read_fds.contains(socket_fd) {
                match socket.recv_from() {
                    Ok((recv_amount, recv_buf)) => {
                        //if incoming packet is encrypted it will be okay to
                        //deccrypt it here and send to tun device
                        let amount = tun.write(&recv_buf[0..recv_amount]);
                        println!("Wrote {} bytes to tun", amount);

                    }
                    Err(e) => {
                        eprintln!("Error reading from socket: {}", e);
                        break;
                    }
                }
            }
        }
        Err(e) => {
            eprintln!("select error: {}", e);
            break;
        }
    }
}
Recall that we have a file desriptor attached to the tun interface, we also need to create a socket that listen to incoming packet. the tun device and socket descriptor are both manage by select to monitor any time there is an event in either of the two file descriptor.
The image below shows the basic flow of the packet from client to server
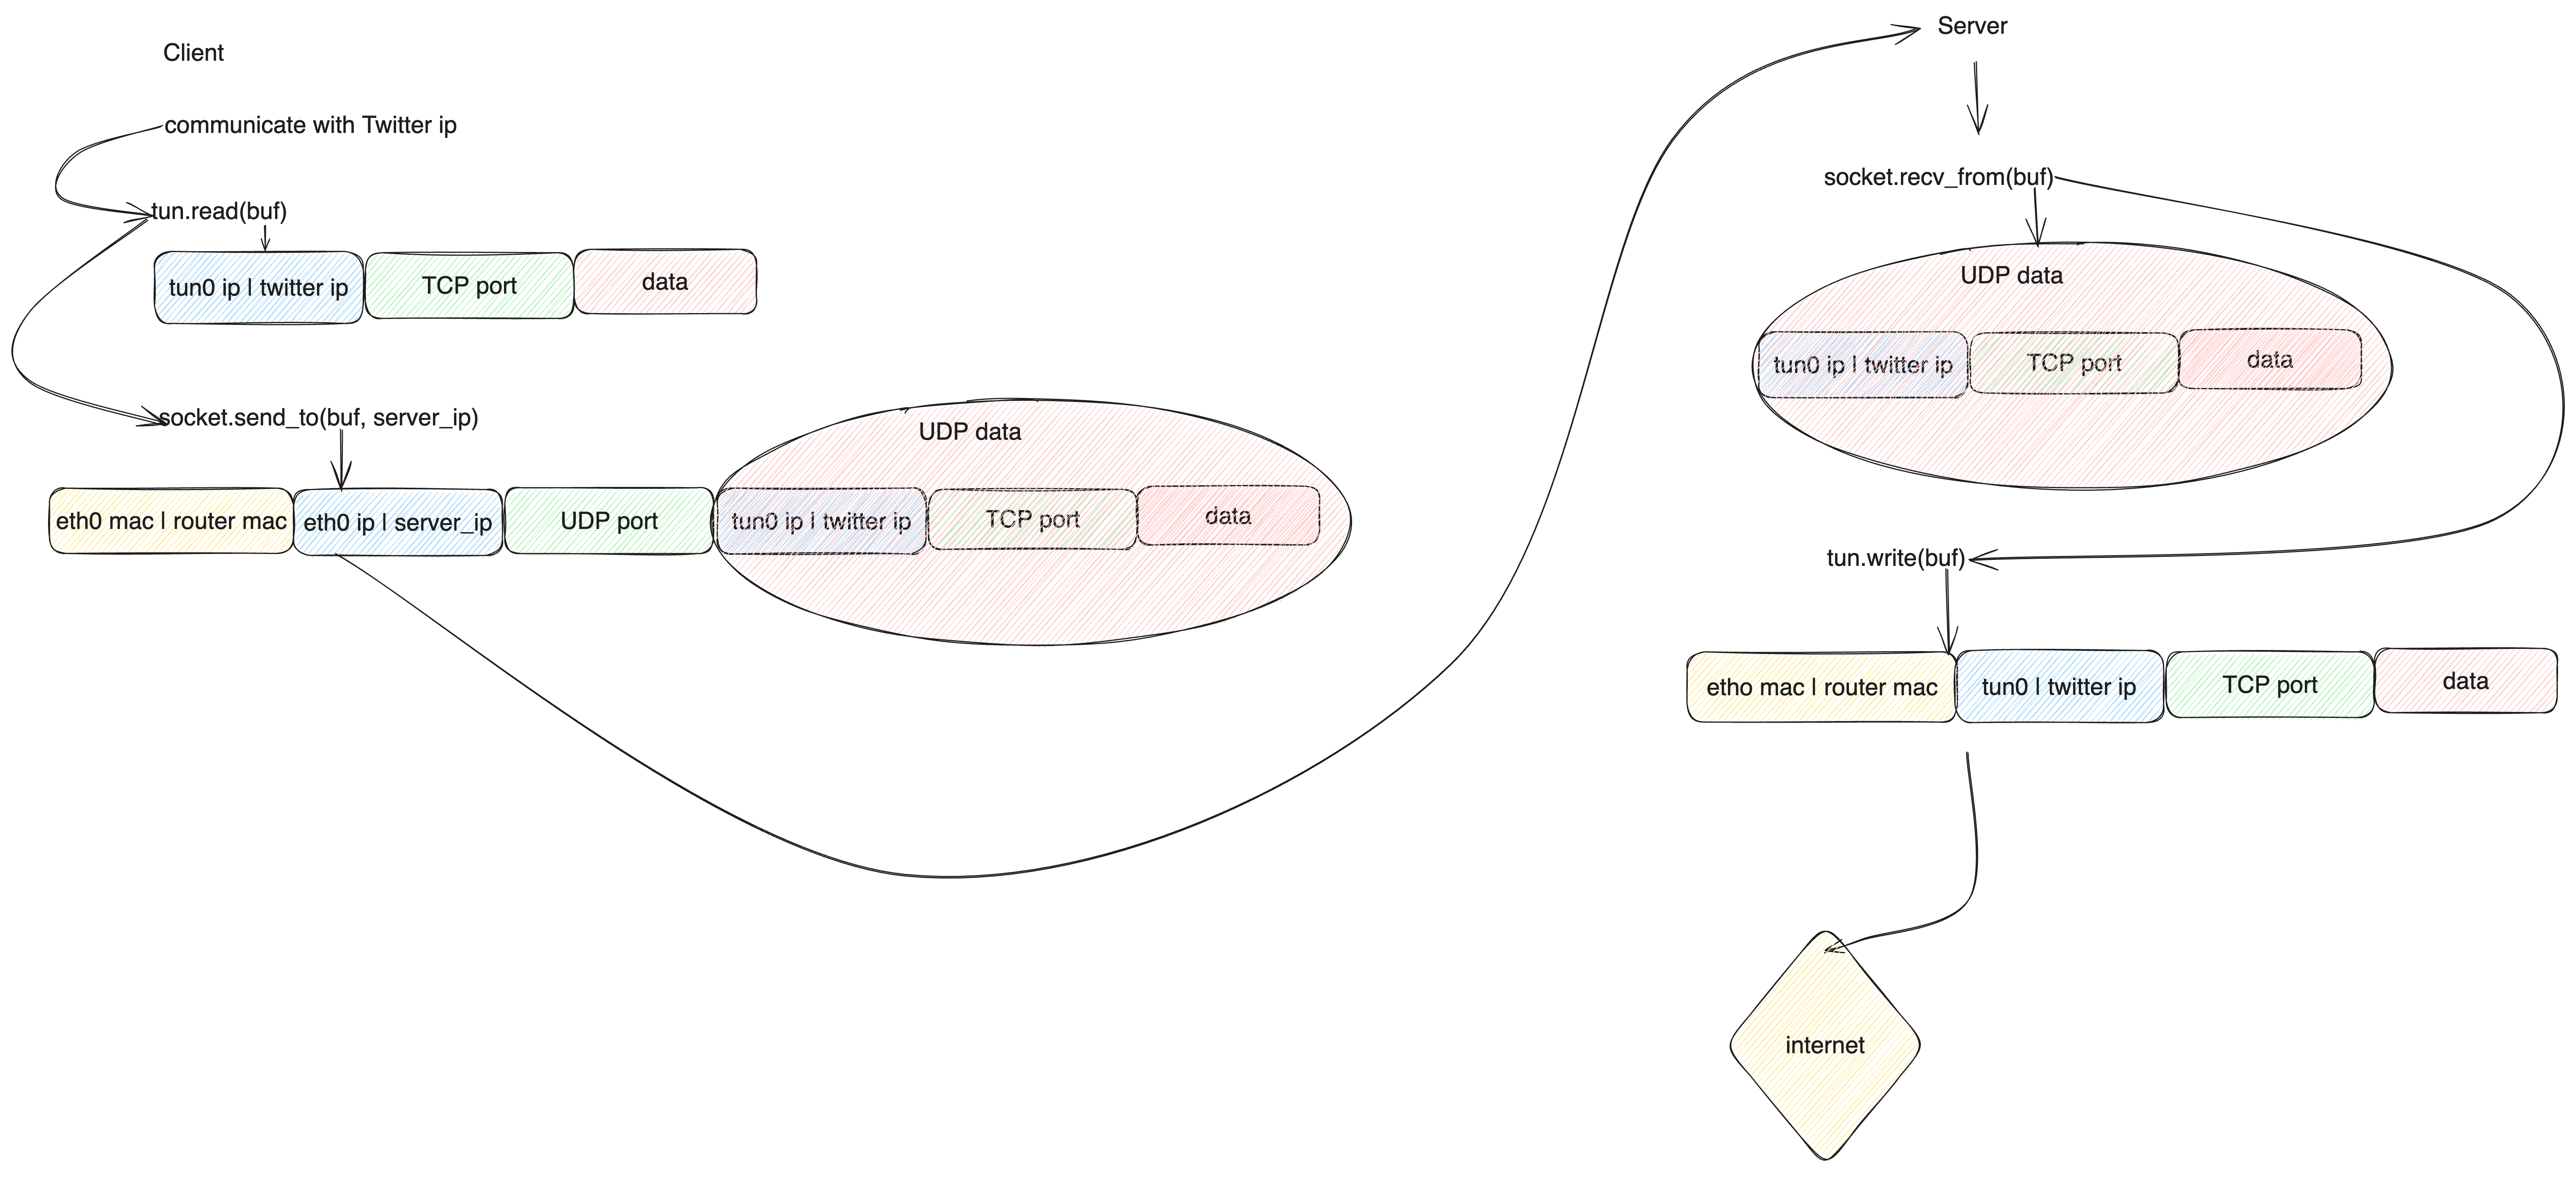
The Udp data sent from the client is wrapped in a circle to show that the client can decide to encrypt the data and the server on recieving the data use the neccessary key to decrypt the data and then send over to the internet. For example wireguard make use of Diffie-Hellman to agreed on the keys used to decrypt and encrypt the packet being sent and recieved.
Localhost Tunneling
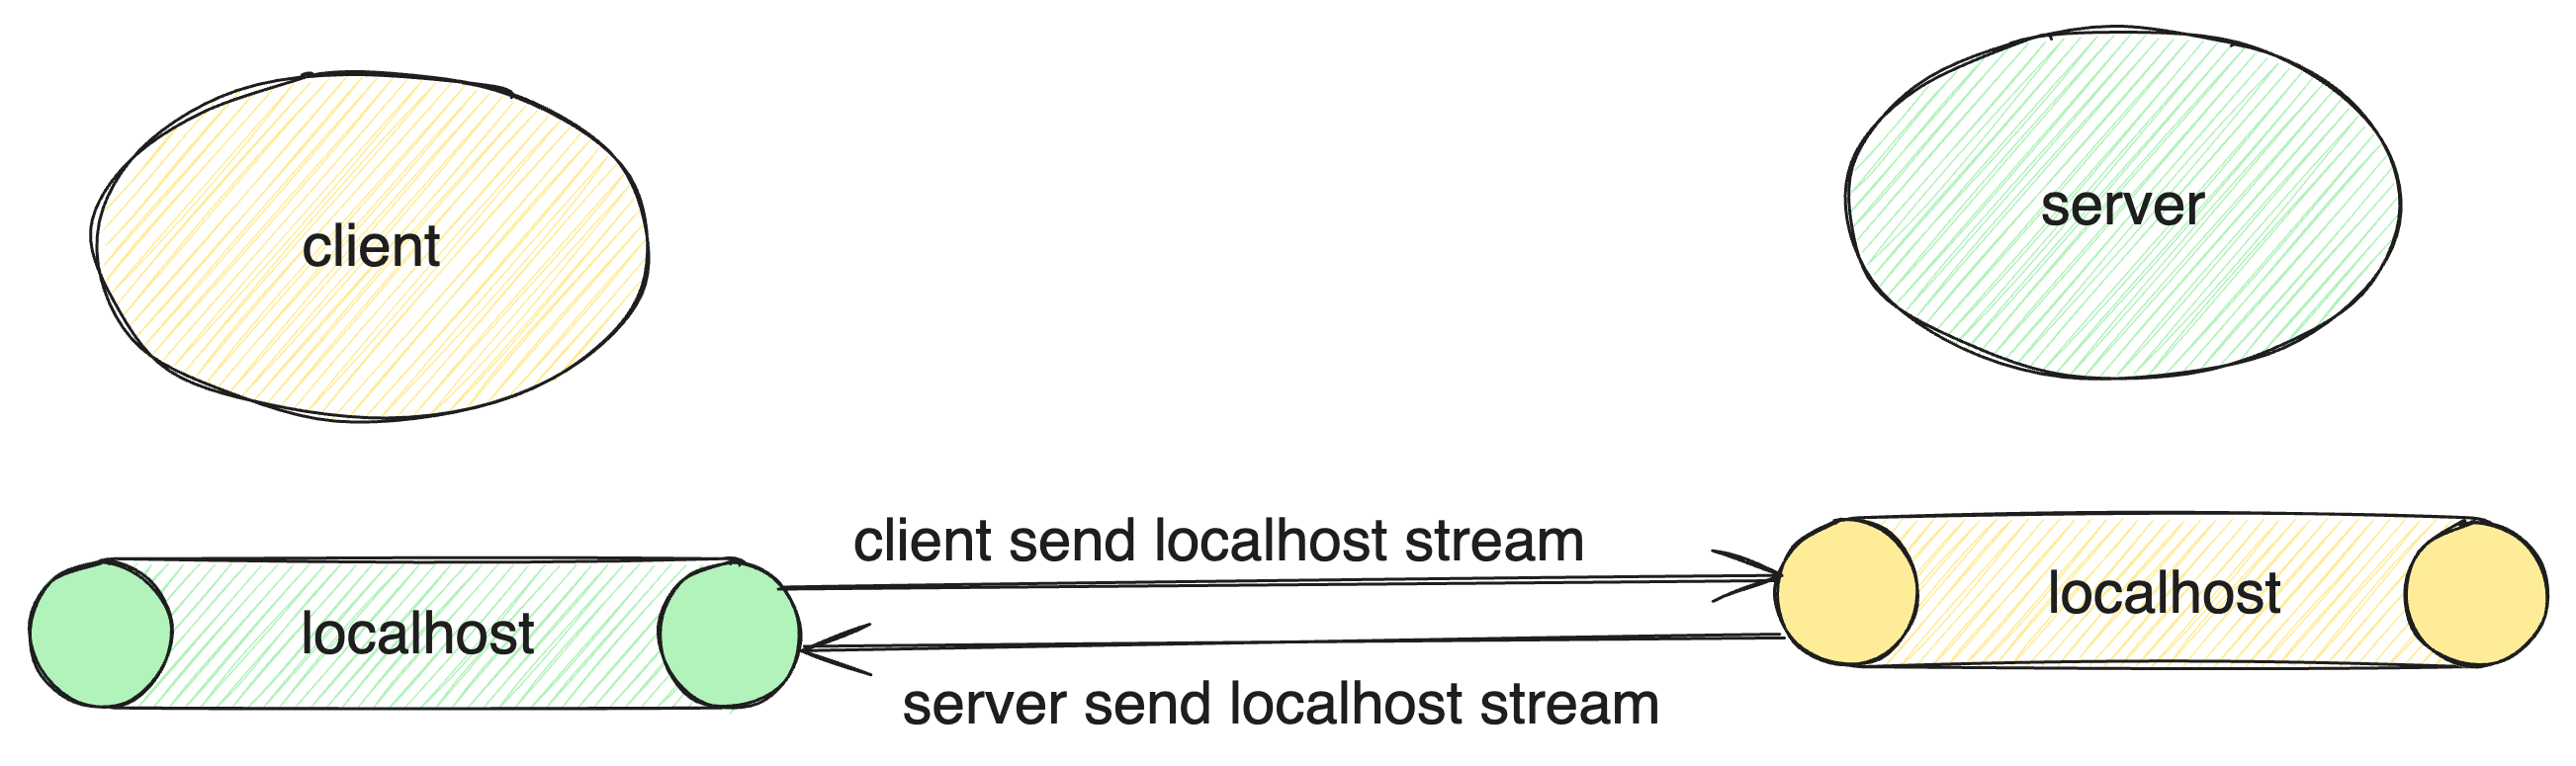
In simple term, it is a technique of exposing your local server or service to the internet or another network. for example we can make the service rendered via localhost:3200 in a client network to be accessible in another network via localhost:3000.
The image below shows a basic flow of how that works
 The whole idea is that you can start a service on client side
$ python3 -m http.server 3200
then, the client has to be aware of the server ip, server port so it get connected to it via e.g 192.168.0.103:8080
let mut server_stream = TcpStream::connect("192.168.0.103:8080")?;
let mut local_stream = TcpStream::connect("127.0.0.1:3200")?;


loop {
    for event in events.iter() {
        match event.token() {
            SERVER => {
                //check if the server_stream is readable
                if event.is_readable() {
                    let mut buf = [0;4096];
                    // get the stream coming from the server
                    let n  = server_stream.read(&buf);
                    if n > 0 {
                        local_stream(&buf[..n]);
                    }
                }
            }
            LOCAL => {
                // check if the local_stream event is readable
                if event.is_readable() {
                    let mut buf = [0;4096];
                    // read into a buf
                    let n = local_stream.read(&buf);
                    if n > 0 {
                        // write to the server
                        server_stream.write(&buf[..n]);
                    }
                }

            }
        }
    }
}
Epoll is used via Tokio mio to manage whenever there is an event from either of the server and local tcpstream.
For the server side, we have to manage the server , the server localhost and the connected client connection
let mut server = TcpListener::bind("0.0.0.0:8080")?;

// store connection between local tcpstream and client tcp stream
let mut client_localstream: HashMap<Token, (TcpStream, TcpStream)> = HashMap::new();

// store connection between local listerner and the incomin client stream
let mut locallistener_clientstream: HashMap<Token, (TcpListener, TcpStream)> = HashMap::new();

loop {
    for event in events.iter() {
        match event.token() {
            SERVER => {
                // ACCEPT connection
                let (mut client_stream, address) = server.accept();

                // for every accepeted connection create a
                // a new local host at a random port
                let local_listener = TcpListerner::bind("127.0.0.1:3000");

                // register the local_listener
                poll.registry().register(
                    &mut local_listener,
                    LOCALCON,
                    Interest::READABLE,
                )?;
                // store in hasmap
                locallistener_clientstream.insert(LOCALCON, (local_listener, client_stream));
            }
            LOCALCON => {
                // manage locallistener connection

                // fetch the local_lsiterner and the client stream
                if let Some((local_listener, mut client_stream)) =
                        locallistener_clientstream.remove(&LOCALCON)
                    {
                        let(mut local_stream, address) = local_listener.accept();

                        //register the local stream in an event
                        poll.registry().register(
                            &mut client_stream,
                            CLIENT,
                            Interest::READABLE | Interest::WRITABLE,
                        )?;
                        poll.registry().register(
                            &mut local_stream,
                            LOCAL,
                            Interest::READABLE | Interest::WRITABLE,
                        )?;

                        client_localstream.insert(CLIENT, (local_stream, client_stream));

                }

            }
            LOCAL => {
                if event.is_readable() {
                     if let Some((local_stream, client_stream)) = client_localstream.get_mut(&CLIENT) {
                         let mut buf = [0; 4096];
                         // fetch incoming packet from the browser
                         let n = local_stream.read(&buf[..n]);
                         if n > 0 {
                             // send the packet to the connected client localhost
                             client_stream.read(&buf[..n]);
                         }
                    }
                }
            }

            CLIENT => {
                if event.is_readable() {
                    if let Some((local_stream, client_stream)) = client_localstream.get_mut(&CLIENT) {
                        let mut buf = [0; 4096];
                        // collect incoming packet from client localhost
                        let n = client_stream.read(&buf[...n]);
                        if n > 0 {
                            // send it to the server local browser
                            local_stream.read(&buf[..n]);
                        }
                    }
                }
            }
        }
    }
}
The code above shows the basic structure of how Tcpstream from the client is piped into the Server localhost Tcpstream. that means what is available in client localhost:3200 is accesbile on the server and if you visit localhost:3000 in the server browser you should see client data.
This example does not contain error handling and reconnection. Check here for the full code. Also reading this code should give you insight into how bore works. the only difference is that bore manage authenctication, persistent connection and make use of asynchronous rust.
Conclusion
The article shows the basic structure of a vpn and localhost network tunnel. it started from the idea of network interface to the basic code structure of how to implement them. There are some few other things we didn’t talk about, for example for both the tunneling and localhost tunneling we added the client ip manually to the server, but the normal way to have done that, is to make the server aware of the client ip via an handshake. Also we didn’t talk about the encryption of the network payload, managing multiple client and also client reconnection. this are more interesting topic if you want to go furthur in implementation and some of the references below and even the project contains such implementation.
Code
Tunneling : https://github.com/systemEng-Learning/simple-wireguard/tree/main/tunnel-indocker/vpn
Localhost tunneling: https://github.com/systemEng-Learning/simple-wireguard/tree/main/tunnel-indocker/localhost-tunnel
References
- Rustun https://github.com/meh/rust-tun
- bore https://github.com/ekzhang/bore
- wireguard-go https://github.com/WireGuard/wireguard-go
- boringtun https://github.com/cloudflare/boringtun
- VPN Tun/Tap and sockets, routing, tunnels and TLS https://www.youtube.com/watch?v=XKV0fSxrCmg&t=2314s